Introduction
I am a second year PhD student based in Auckland, New Zealand. I study a stem cell population from the human placenta and its potential role in babies that are born dangerously small (fetal growth restriction).
Previously, my science thoughts and records existed almost solely in Notion. I transitioned to Roam some 2 months ago and I have relieved Notion of some duties since then. My current workflow involves Roam for the thinking and planning phase, with Notion as a front-facing lab book and results record that I can easily show to supervisors.
At any given moment, I have multiple experiments running and therefore multiple trains of thought. I needed somewhere to think. Roam takes away the impulse to first ask “where do these thoughts go?” before you start writing, since block references allow connections to be made regardless of filing location. This makes putting down stray thoughts throughout the day more welcoming and less cumbersome.
Nomenclature is key
In order to be useful, a ‘second brain’ like the one I’m trying to build needs to be searchable. This is why I follow strict nomenclature rules for pages. They need to be phrased so that I can expect to easily access this information by typing keywords into the search bar or directly into double parentheses to reference the relevant block when I need it next. Sometimes I phrase titles like a question you might enter into Google search, so the Roam search bar can be used in the same way to search your second brain collections. Examples below:
- Experiments: [[exp shortnameofexperiment]]
- SOPs: [[SOP How to choose an antibody]].
Phrase expanding software
I install PhraseExpress on every computer I use in order to quickly insert phrases. The ones I add range from commonly used Greek alphabet letters to templates for Roam pages. I use a ‘.text’ format for my trigger phrases so they don’t overlap with anything else I’m typing. Read on for examples of templates I use PhraseExpress to insert.
Aspects of my lab workflow in Roam
SOPs
Standard operating procedures for how you should approach a task are intended to be simple instructions you can follow along with to ensure you have ‘thought of everything’, or to maintain uniformity in the way you bring data into Roam so that information remains clean and easy to access/read. Learning to do things in the lab can be intimidating at first, so these can also be given to new lab members to help with their transition!
When I purchase a new reagent or product, I add it to Roam along with its metadata. Doing this for antibodies has been useful for easily tagging the antibodies I have when writing up plans for immunostaining experiments.
I used Maggie Appleton’s CSS code to change the tag color to match the fluorophore color on conjugated antibodies, which also makes double-staining experiments visually simple to plan and follow. (More information about customising the look of your Roam database can be found here.)
I then insert the template for key metadata related to a reagent/antibody (pulled from the product webpage using the Roam Highlighter Google Chrome extension), and link that product webpage to its catalogue number for easy reordering and accessing of datasheets.
Experiment pages
I start a new page for each experiment and again use the phrase expander to insert the template below:
Aim: of experiment
Background: what past experiments and literature informs this experiment? Why is it relevant?
Data collection days: which days of the experiment will data collection occur?
Output data: what do you expect to generate from the data? A figure? If so, what magnification and which days of the experiment will you present in the figure? How many replicates to do? (This information will inform the design of your data collection process.)
==========
Workflow
Prep ahead: reagents to make ahead, plates to coat with protein beforehand etc… (Refer to this page at least a day before you plan do conduct the experiment.)
Plan: the at-a-glance, step-by-step workflow for the day of the experiment. (I keep this concise as all my protocols are still in Notion, which is where the more detailed protocol lives and which comes into the lab with me on my iPad.)
Schedule: a list of the days that the experiment will span (e.g. Day 1-14), with tasks to be done on each day embedded within the block for that day. (This schedule will be copied into the [[activecultures]] page.)
activecultures page
This is where the raw cell culture records, including notes, reminders, tracking and planning, goes. It is intended to be a robust record of what was done to my precious cells and to help ensure that they are well cared for, without these details clogging up my lab notebook. This record accompanies my lab notebook in Notion, where I record what I did each lab day concisely in a blog or journal-like format.
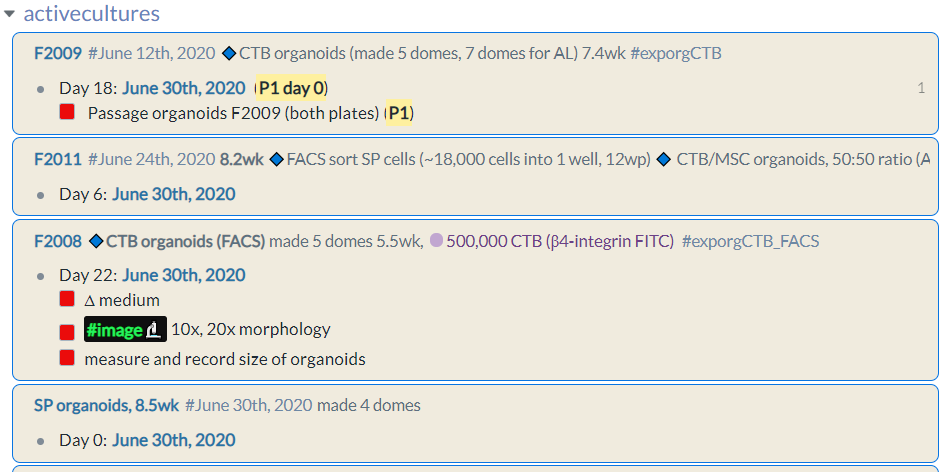
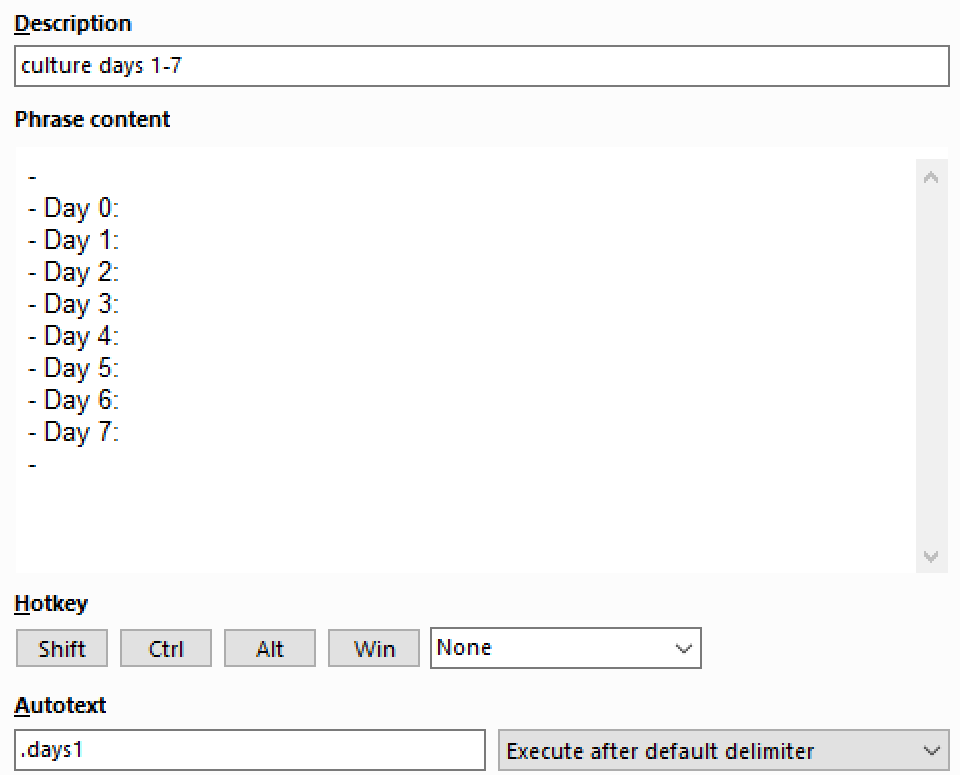
For every new flask/culture plate I introduce to my incubator, I record its sample ID and key information within the same block using line breaks (Shift+Enter). Nested in this block is the schedule for that plate. I start by expanding the days 1 to 7 using PhraseExpress, then tag the daily page that corresponds to each day in culture. Roam Toolkit makes increasing the date super easy.
Next, I go through and put in to-dos for each day using line breaks (this is important because I want them to show up without having to expand the block in the references of my Daily Notes page). This has been a lab workhorse for me since I introduced it, and has meant that:
- First thing in the morning each day, I can see in the Linked References section of my daily page exactly what cells need a medium change or passaging at-a-glance (yes I am obsessed with at-a-glance layouts in my workflow).
- As I check off completed tasks for the day, the [[activecultures]] page becomes a record of the manipulations, observations, and experiments done on each replicate, linked to the experiment page.
Lastly, my ‘floating’ blocks
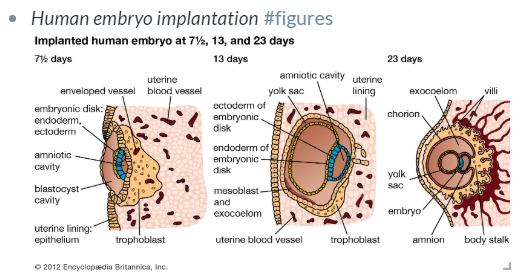
This is just one of many ways to harness the power of bidirectional linking! I can leave statements, statistics, and figures anywhere in Roam and re-use them when I need, using block references (or block embed if it makes sense—for example with to-dos that apply to multiple experiments/projects). For figures, I use a line break to record a short title (searchable keywords of course) and tag it #figures to find it easily later.
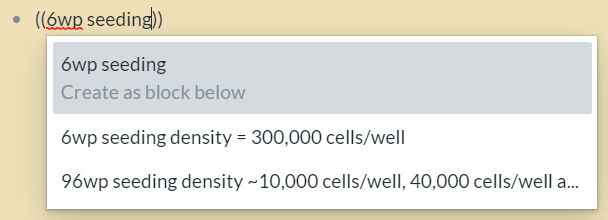
For example, I can reference the block containing the cell seeding density I usually use while planning an experiment.
Good figures I stumble upon in the literature can be saved in the same way.
Notes to self are useful for recording locations of aliquots and reagents.
I also record notes to self during experiments: for example, a suitable dilution ratio that I have found to work well for a protocol, tagged #fromexperience.
Concluding remarks
This ever-evolving Roam setup has helped hugely with my daily lab work, and I can leave the lab each day knowing for sure that I haven’t missed any details and that all my cells are well cared for. My whole system is still heavily reliant on Notion as it’s the easiest way for me to record results with images in a visually friendly blog-like format.
A Roam app may change this, but relational databases in Notion still have their applications for me. The greatest change Roam has brought is relief from note-taking anxiety and freeing up my mind from floating thoughts. I now have another brain to keep track of multiple running experimental timelines in the background, so I can focus on the tasks at hand during each workday.
My end goal is to standardise the system and introduce it to an entire lab group — so every member can benefit from summaries made of papers being read, and the pipeline for recording and sharing of data/plans is uniform and clear. This would allow new members to integrate into the team smoothly and to pick the brains of their peers for nuggets of experience and more.


